Let's Encryptで無料のSSL証明書を取得する方法
開発環境などでhttps接続をしたい場合はオレオレ証明書(自己署名証明書)を使って構築することがあるが、
ちゃんとした証明書を使いたいことが度々出てくる。
そんな時に「Let's Encrypt」というサイトで無料のSSL証明書を取得することができたので、
このブログサーバー(AWS EC2、AmazonLinux)に導入しつつ記録を残しておく。
公式サイト:https://letsencrypt.org/
1. Certbotをインストールする。
証明書の取得 & 自動更新は「Certbot」というソフトを使って行うので、「Certbot」のインストールを行う。
1-1. Certbotの公式サイトへアクセスする。
公式サイト:https://certbot.eff.org/
1-2. インストール手順を確認する。
どの環境にインストールするか選択を行う。
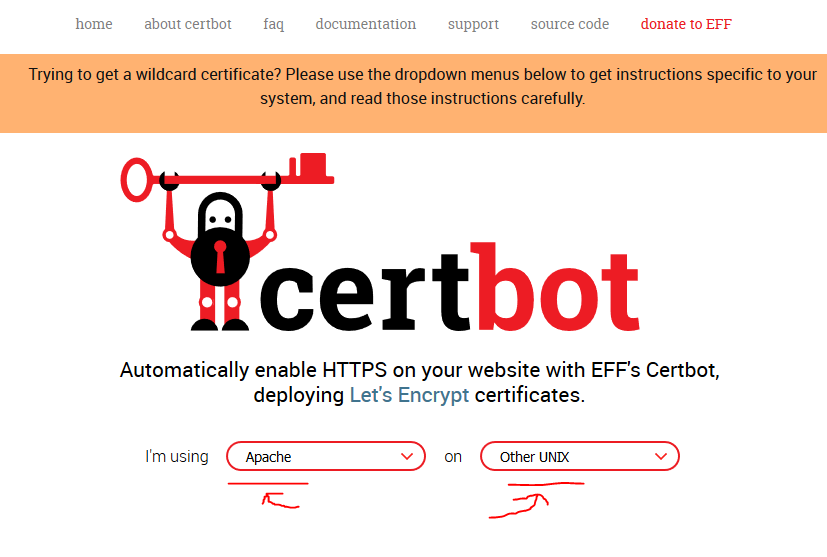
すると画面がスクロールし、インストール説明が現れる。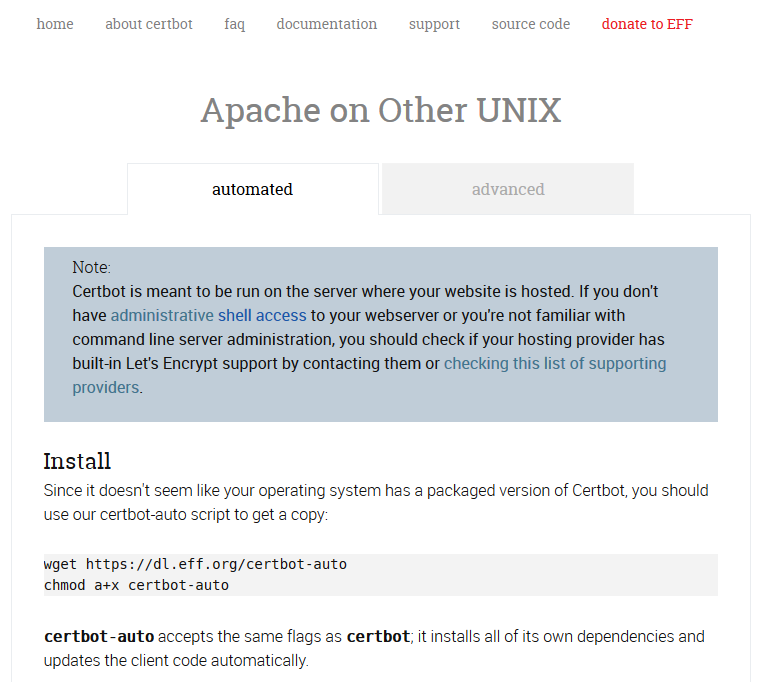
1-3. 手順に従ってインストールする。
※先に「sudo su -」でrootへ成り上がっておく。
以下のコマンドを実行する。
cd /usr/bin
wget https://dl.eff.org/certbot-auto
chmod a+x certbot-auto
2. SSL証明書を取得する。
以下のコマンドを実行し、SSL証明書を取得する。
■フォーマット
certbot-auto certonly --webroot -w {Apacheの公開ディレクトリ} -d {ドメイン名} --email {連絡先のメールアドレス} -n --agree-tos --debug
■例
certbot-auto certonly --webroot -w /var/www -d forest-soft.xyz --email info@forest-soft.net -n --agree-tos --debug
※証明書を取得する際にLet's Encrypt側からサーバー存在確認のアクセスが来るため、Basic認証をかけていたりするとエラーになる。
そのため/etc/httpd/conf.d/virtualhost.confなどで
<Directory "/var/www/.well-known/acme-challenge">
Satisfy Any
Allow from all
</Directory>
というように「http://{ドメイン名}/.well-known/acme-challenge」へのアクセス時にBasic認証を無効にしておく必要がある。
■実行結果
Bootstrapping dependencies for Amazon... (you can skip this with --no-bootstrap)
yum is /usr/bin/yum
To use Certbot, packages from the EPEL repository need to be installed.
Enabling the EPEL repository in 1 second....
Loaded plugins: priorities, update-motd, upgrade-helper
Package epel-release-6-8.9.amzn1.noarch already installed and latest version
Nothing to do
yum is hashed (/usr/bin/yum)
To use Certbot, packages from the EPEL repository need to be installed.
Enabling the EPEL repository in 1 second....
Loaded plugins: priorities, update-motd, upgrade-helper
Package epel-release-6-8.9.amzn1.noarch already installed and latest version
Nothing to do
Loaded plugins: priorities, update-motd, upgrade-helper
Resolving Dependencies
・・・略・・・
Complete!
Creating virtual environment...
Installing Python packages...
Installation succeeded.
Saving debug log to /var/log/letsencrypt/letsencrypt.log
Plugins selected: Authenticator webroot, Installer None
Obtaining a new certificate
Performing the following challenges:
http-01 challenge for forest-soft.xyz
Using the webroot path /var/www for all unmatched domains.
Waiting for verification...
Cleaning up challenges
IMPORTANT NOTES:
- Congratulations! Your certificate and chain have been saved at:
/etc/letsencrypt/live/forest-soft.xyz/fullchain.pem
Your key file has been saved at:
/etc/letsencrypt/live/forest-soft.xyz/privkey.pem
Your cert will expire on 2019-01-01. To obtain a new or tweaked
version of this certificate in the future, simply run certbot-auto
again. To non-interactively renew *all* of your certificates, run
"certbot-auto renew"
- Your account credentials have been saved in your Certbot
configuration directory at /etc/letsencrypt. You should make a
secure backup of this folder now. This configuration directory will
also contain certificates and private keys obtained by Certbot so
making regular backups of this folder is ideal.
- If you like Certbot, please consider supporting our work by:
Donating to ISRG / Let's Encrypt: https://letsencrypt.org/donate
Donating to EFF: https://eff.org/donate-le
エラーが出ずに終われば以下のディレクトリに証明書が作られている。
/etc/letsencrypt/live/{ドメイン名}
ls -la /etc/letsencrypt/live/forest-soft.xyz
total 12
drwxr-xr-x 2 root root 4096 Oct 3 15:09 .
drwx------ 3 root root 4096 Oct 3 15:09 ..
lrwxrwxrwx 1 root root 39 Oct 3 15:09 cert.pem -> ../../archive/forest-soft.xyz/cert1.pem
lrwxrwxrwx 1 root root 40 Oct 3 15:09 chain.pem -> ../../archive/forest-soft.xyz/chain1.pem
lrwxrwxrwx 1 root root 44 Oct 3 15:09 fullchain.pem -> ../../archive/forest-soft.xyz/fullchain1.pem
lrwxrwxrwx 1 root root 42 Oct 3 15:09 privkey.pem -> ../../archive/forest-soft.xyz/privkey1.pem
-rw-r--r-- 1 root root 682 Oct 3 15:09 README
3. ApacheにSSL証明書を設定する。
3-1. /etc/httpd/conf.d/ssl.confを編集する。
■編集前(101行目辺り)
# Server Certificate:
# Point SSLCertificateFile at a PEM encoded certificate. If
# the certificate is encrypted, then you will be prompted for a
# pass phrase. Note that a kill -HUP will prompt again. A new
# certificate can be generated using the genkey(1) command.
SSLCertificateFile /etc/pki/tls/certs/localhost.crt
# Server Private Key:
# If the key is not combined with the certificate, use this
# directive to point at the key file. Keep in mind that if
# you've both a RSA and a DSA private key you can configure
# both in parallel (to also allow the use of DSA ciphers, etc.)
SSLCertificateKeyFile /etc/pki/tls/private/localhost.key
# Server Certificate Chain:
# Point SSLCertificateChainFile at a file containing the
# concatenation of PEM encoded CA certificates which form the
# certificate chain for the server certificate. Alternatively
# the referenced file can be the same as SSLCertificateFile
# when the CA certificates are directly appended to the server
# certificate for convinience.
#SSLCertificateChainFile /etc/pki/tls/certs/server-chain.crt
■編集後
※赤字のPathは手順「2.」にて確認したものを使用する。
# Server Certificate:
# Point SSLCertificateFile at a PEM encoded certificate. If
# the certificate is encrypted, then you will be prompted for a
# pass phrase. Note that a kill -HUP will prompt again. A new
# certificate can be generated using the genkey(1) command.
SSLCertificateFile /etc/letsencrypt/live/forest-soft.xyz/cert.pem
# Server Private Key:
# If the key is not combined with the certificate, use this
# directive to point at the key file. Keep in mind that if
# you've both a RSA and a DSA private key you can configure
# both in parallel (to also allow the use of DSA ciphers, etc.)
SSLCertificateKeyFile /etc/letsencrypt/live/forest-soft.xyz/privkey.pem
# Server Certificate Chain:
# Point SSLCertificateChainFile at a file containing the
# concatenation of PEM encoded CA certificates which form the
# certificate chain for the server certificate. Alternatively
# the referenced file can be the same as SSLCertificateFile
# when the CA certificates are directly appended to the server
# certificate for convinience.
SSLCertificateChainFile /etc/letsencrypt/live/forest-soft.xyz/chain.pem ←コメントアウト解除
3-2. Apacheを再起動し、SSL証明書が設定されていることを確認する。
以下のコマンドでApacheを再起動する。
service httpd restart
その後ブラウザでhttps://{ドメイン名}にアクセスしてみる。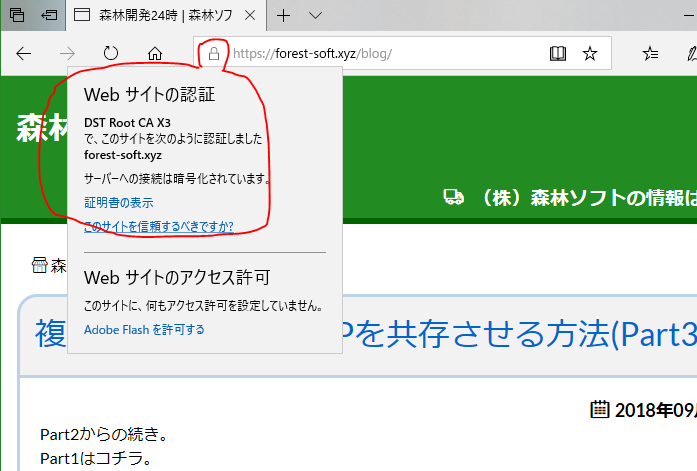
鍵マークが表示され、無事に導入ができた!
4. SSL証明書の自動更新設定を行う。
「Let's Encrypt」で発行されるSSL証明書は2か月ほどしか有効期限が無いため、
そのまま放置しているとすぎに期限が切れてしまう。
なので自動で更新する設定を仕込んでおく必要がある。
4-1. 手動でSSL証明書が更新できることを確認する。
以下のコマンドを実行すると証明書を手動で更新することができる。
certbot-auto renew
Saving debug log to /var/log/letsencrypt/letsencrypt.log
- - - - - - - - - - - - - - - - - - - - - - - - - - - - - - - - - - - - - - - -
Processing /etc/letsencrypt/renewal/forest-soft.xyz.conf
- - - - - - - - - - - - - - - - - - - - - - - - - - - - - - - - - - - - - - - -
Cert not yet due for renewal
- - - - - - - - - - - - - - - - - - - - - - - - - - - - - - - - - - - - - - - -
The following certs are not due for renewal yet:
/etc/letsencrypt/live/forest-soft.xyz/fullchain.pem expires on 2019-01-01 (skipped)
No renewals were attempted.
- - - - - - - - - - - - - - - - - - - - - - - - - - - - - - - - - - - - - - - -
ただし有効期限切れ直前じゃないと更新処理がスキップされてしまうみたいなので、
強制更新のパラメーターを付与して実行する。
certbot-auto renew --force-renewal
Saving debug log to /var/log/letsencrypt/letsencrypt.log
- - - - - - - - - - - - - - - - - - - - - - - - - - - - - - - - - - - - - - - -
Processing /etc/letsencrypt/renewal/forest-soft.xyz.conf
- - - - - - - - - - - - - - - - - - - - - - - - - - - - - - - - - - - - - - - -
Plugins selected: Authenticator webroot, Installer None
Renewing an existing certificate
Performing the following challenges:
http-01 challenge for forest-soft.xyz
Waiting for verification...
Cleaning up challenges
- - - - - - - - - - - - - - - - - - - - - - - - - - - - - - - - - - - - - - - -
new certificate deployed without reload, fullchain is
/etc/letsencrypt/live/forest-soft.xyz/fullchain.pem
- - - - - - - - - - - - - - - - - - - - - - - - - - - - - - - - - - - - - - - -
- - - - - - - - - - - - - - - - - - - - - - - - - - - - - - - - - - - - - - - -
Congratulations, all renewals succeeded. The following certs have been renewed:
/etc/letsencrypt/live/forest-soft.xyz/fullchain.pem (success)
- - - - - - - - - - - - - - - - - - - - - - - - - - - - - - - - - - - - - - - -
SSL証明書ファイルを確認してみると・・・
ls -la /etc/letsencrypt/live/forest-soft.xyz
total 12
drwxr-xr-x 2 root root 4096 Oct 3 15:40 .
drwx------ 3 root root 4096 Oct 3 15:09 ..
lrwxrwxrwx 1 root root 39 Oct 3 15:40 cert.pem -> ../../archive/forest-soft.xyz/cert2.pem
lrwxrwxrwx 1 root root 40 Oct 3 15:40 chain.pem -> ../../archive/forest-soft.xyz/chain2.pem
lrwxrwxrwx 1 root root 44 Oct 3 15:40 fullchain.pem -> ../../archive/forest-soft.xyz/fullchain2.pem
lrwxrwxrwx 1 root root 42 Oct 3 15:40 privkey.pem -> ../../archive/forest-soft.xyz/privkey2.pem
-rw-r--r-- 1 root root 682 Oct 3 15:09 README
コマンドを実行した日時でファイルが上書きされた!
4-2. SSL証明書更新コマンドをcronに追加し、自動実行させる。
cronに以下の内容を登録する。
crontab -e
0 1 * * * certbot-auto renew --post-hook "/sbin/service httpd graceful"
これで毎日1時にSSL証明書の更新チェックが走り、有効期限が切れそうなタイミングになったら自動で更新される。
また、「post-hook」パラメーターを指定するとSSL証明書の更新を行ったときに実行させるコマンドを指定することができるので、
「/sbin/service httpd graceful」と指定すると、
SSL証明書の更新 + Apcheの再起動
をセットで行うことができるので、後は放置でOKとなる。