Amazon Linux 2でRedmineを立ち上げる方法
Redmineのプラグインを開発するにあたってプレーンなRedmineを立ち上げる必要があったのでメモしておく。
今回の環境は
・Amazon Linux 2
・Redmine 4.2
・Apache 2.4
・MySQL 8(utf8mb4)
・Unicorn
・rbenv + ruby-build
・Ruby 2.7
を使い、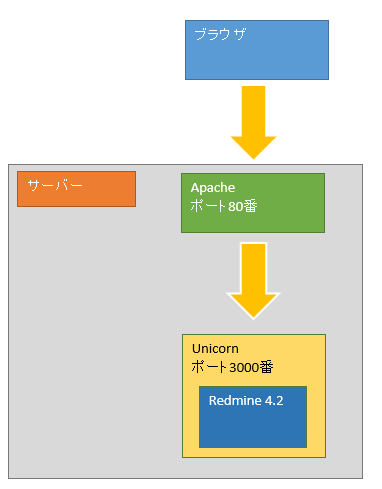
という構成にする。
また、Redmineは「http://~/redmine/」というようにサブディレクトリで動かすパターンでいく。
Amazon Linux 2のインスタンスを立ち上げたところからスタートする。
1. rootに成り上がる。
sudo su -
1. Apacheをインストールする。
yum -y install httpd openssl
systemctl enable httpd
systemctl start httpd
「http://~/」にアクセスし、Apacheのデフォルトページが表示されれば成功です。
2. MySQLをインストールする。
MariaDBならyumコマンド一発でインストールできるので簡単だが、
Redmineのインストール時にマイグレーションファイルを実行すると
Mysql2::Error: Specified key was too long; max key length is 767 bytes: CREATE UNIQUE INDEX `changesets_repos_rev` ON `changesets` (`repository_id`, `revision`)
/var/lib/redmine/db/migrate/091_change_changesets_revision_to_string.rb:17:in `up'
/var/lib/rbenv/versions/2.7.3/bin/bundle:23:in `load'
/var/lib/rbenv/versions/2.7.3/bin/bundle:23:in `<main>'
というエラーが起きてしまう。
MariaDBの/etc/my.cnfでmysqldセクションに「innodb_large_prefix=1」を追加すると上記のエラーは起こらなくなるが、
Mysql2::Error: Index column size too large. The maximum column size is 767 bytes.: CREATE INDEX `wiki_pages_wiki_id_title` ON `wiki_pages` (`wiki_id`, `title`)
/var/lib/redmine/db/migrate/028_create_wiki_pages.rb:8:in `up'
/var/lib/rbenv/versions/2.7.3/bin/bundle:23:in `load'
/var/lib/rbenv/versions/2.7.3/bin/bundle:23:in `<main>'
といった感じで別のエラーで止まってしまう。
MariaDBのスキーマをutf8mb4ではなくutf8にしたり、あと何回かリトライすればうまく行くかもしれないが、
今回は深追いせずにMySQLでのインストールにした。
MySQLの立ち上げ時にメモリが足りないと起動できないため、まずはスワップファイルを作成する。
dd if=/dev/zero of=/swapfile bs=1M count=3072
mkswap /swapfile
swapon /swapfile
echo "/swapfile swap swap defaults 0 0" >> /etc/fstab
次にMySQL 8をインストールする。
rpm -ivh https://dev.mysql.com/get/mysql80-community-release-el7-3.noarch.rpm
yum -y install mysql-community-server
systemctl enable mysqld
systemctl start mysqld
インストール時にrootユーザーの初期パスワードがランダムで生成されるので、以下のコマンドでパスワードが書かれている行を抜き出す。
cat /var/log/mysqld.log | grep "A temporary password"
2021-06-11T03:20:46.004298Z 6 [Note] [MY-010454] [Server] A temporary password is generated for root@localhost: パスワード
そして初期セットアップ用のコマンドを実行し、初期パスワードを変更する。
mysql_secure_installation
Securing the MySQL server deployment.
Enter password for user root: 初期パスワードを入力
The existing password for the user account root has expired. Please set a new password.
New password: 新パスワードを入力
Re-enter new password: 新パスワードを入力
The 'validate_password' component is installed on the server.
The subsequent steps will run with the existing configuration
of the component.
Using existing password for root.
Estimated strength of the password: 100
Change the password for root ? ((Press y|Y for Yes, any other key for No) : そのままエンター
... skipping.
By default, a MySQL installation has an anonymous user,
allowing anyone to log into MySQL without having to have
a user account created for them. This is intended only for
testing, and to make the installation go a bit smoother.
You should remove them before moving into a production
environment.
Remove anonymous users? (Press y|Y for Yes, any other key for No) : そのままエンター
... skipping.
Normally, root should only be allowed to connect from
'localhost'. This ensures that someone cannot guess at
the root password from the network.
Disallow root login remotely? (Press y|Y for Yes, any other key for No) : そのままエンター
... skipping.
By default, MySQL comes with a database named 'test' that
anyone can access. This is also intended only for testing,
and should be removed before moving into a production
environment.
Remove test database and access to it? (Press y|Y for Yes, any other key for No) : そのままエンター
... skipping.
Reloading the privilege tables will ensure that all changes
made so far will take effect immediately.
Reload privilege tables now? (Press y|Y for Yes, any other key for No) : そのままエンター
... skipping.
All done!
これで初期セットアップ完了なので、
mysql -u root -p
と打ってMySQLに接続できたら成功。
3. rbenvとruby-buildをインストールする。
Ruby単独でインストールすることもできるが、rbenvを使うとRubyのバージョンを簡単に切り替えることができるようになる。
Redmineのバージョンアップ時にRubyのバージョンを切り替える必要が出てくるので、そういう時に便利だ。
ただしRubyをソースからコンパイルしている関係でインストールにはそれなりの時間がかかってしまうのが難点。
まずはコンパイル時に必要なもろもろをインストールする。
yum -y install git gcc openssl-devel mysql-devel
次にrbenvをインストールする。
手順はrbenvのインストールマニュアル( https://github.com/rbenv/rbenv#basic-github-checkout )とほぼ一緒。
git clone https://github.com/rbenv/rbenv.git /var/lib/rbenv
cd /var/lib/rbenv && src/configure && make -C src
echo 'export RBENV_ROOT=/var/lib/rbenv' >> ~/.bash_profile
echo 'export PATH="$RBENV_ROOT/bin:$PATH"' >> ~/.bash_profile
/var/lib/rbenv/bin/rbenv init
を実行すると
# Load rbenv automatically by appending
# the following to ~/.bash_profile:
eval "$(rbenv init - bash)"
と表示されるため、表示された内容を「~/.bash_profile」に書き込むために以下のコマンドを実行する。
echo 'eval "$(rbenv init -)"' >> ~/.bash_profile
実行した後はいったん再ログインする。
exit
sudo su -
そしてrbenv-doctorを実行してインストール完了と行きたいところだが、
curl -fsSL https://github.com/rbenv/rbenv-installer/raw/main/bin/rbenv-doctor | bash
Checking for `rbenv' in PATH: /var/lib/rbenv/bin/rbenv
Checking for rbenv shims in PATH: OK
Checking `rbenv install' support: not found
Unless you plan to add Ruby versions manually, you should install ruby-build.
Please refer to https://github.com/rbenv/ruby-build#installation
Counting installed Ruby versions: none
There aren't any Ruby versions installed under `/var/lib/rbenv/versions'.
You can install Ruby versions like so: rbenv install <version>
Checking RubyGems settings: OK
Auditing installed plugins: OK
というようにruby-buildが無いと言われてしまうのでインストールする。
手順はruby-buildのインストールマニュアル( https://github.com/rbenv/ruby-build#installation )の「As an rbenv plugin」のパターンを参照する。
mkdir -p "$(rbenv root)"/plugins
git clone https://github.com/rbenv/ruby-build.git "$(rbenv root)"/plugins/ruby-build
これでruby-buildがインストールできたので、もう一度rbenv-doctorを実行する。
curl -fsSL https://github.com/rbenv/rbenv-installer/raw/main/bin/rbenv-doctor | bash
Checking for `rbenv' in PATH: /var/lib/rbenv/bin/rbenv
Checking for rbenv shims in PATH: OK
Checking `rbenv install' support: /var/lib/rbenv/plugins/ruby-build/bin/rbenv-install (ruby-build 20210526-2-g1063ef6)
Counting installed Ruby versions: none
There aren't any Ruby versions installed under `/var/lib/rbenv/versions'.
You can install Ruby versions like so: rbenv install 3.0.1
Checking RubyGems settings: OK
Auditing installed plugins: OK
バッチリ成功。
4. Ruby 2.7をインストールする。
先ほどインストールしたrbenvを使ってインストールしていく。
Redmineのインストールマニュアル( https://www.redmine.org/projects/redmine/wiki/RedmineInstall#Ruby-interpreter )によると
Redmine 4.2で使えるRubyは2.4, 2.5, 2.6, 2.7だそうなので、とりあえず一番新しい2.7を採用する。
「rbenv install --list-all」でインストール可能なバージョンの一覧が出てくるので、このリストを2.7系に絞ると
rbenv install --list-all | grep 2.7.
2.7.0-dev
2.7.0-preview1
2.7.0-preview2
2.7.0-preview3
2.7.0-rc1
2.7.0-rc2
2.7.0
2.7.1
2.7.2
2.7.3
jruby-9.2.7.0
rbx-2.71828182
最新のものは「2.7.3」なようなのでこのバージョンをインストールする。
rbenv install 2.7.3 ※しばらく待つ。
rbenv global 2.7.3
ruby -v
ruby 2.7.3p183 (2021-04-05 revision 6847ee089d) [x86_64-linux]
無事Ruby 2.7が使えるようになった。
5. Redmineをインストールする。
基本的にはRedmineのインストールマニュアル( https://www.redmine.org/projects/redmine/wiki/RedmineInstall )の手順で進める。
Step 1 - Redmine application
最新のダウンロードURLはRedmineのダウンロードページ( https://www.redmine.org/projects/redmine/wiki/Download )にて確認できる。
cd /var/lib
wget https://www.redmine.org/releases/redmine-4.2.1.zip
unzip redmine-4.2.1.zip
mv redmine-4.2.1 redmine
rm -f redmine-4.2.1.zip
Step 2 - Create an empty database and accompanying user
Redmine用のユーザー、スキーマを作成する。
mysql -u root -p
CREATE DATABASE redmine CHARACTER SET utf8mb4;
CREATE USER 'redmine'@'localhost' IDENTIFIED BY 'redmineユーザーのパスワード';
GRANT ALL PRIVILEGES ON redmine.* TO 'redmine'@'localhost';
exit
mysql -u redmine -p
でredmineユーザーでログインできたら成功。
Step 3 - Database connection configuration
DB接続用の設定ファイルを作成する。
Redmineのインストールディレクトリ配下のconfigディレクトリに「database.yml.example」というサンプルファイルが居るので、これをコピーして編集する。
cd /var/lib/redmine/config
cp database.yml.example database.yml
vi database.yml
# Default setup is given for MySQL 5.7.7 or later.
# Examples for PostgreSQL, SQLite3 and SQL Server can be found at the end.
# Line indentation must be 2 spaces (no tabs).
production:
adapter: mysql2
database: redmine
host: localhost
username: redmine ←rootからredmineに変更
password: "redmineユーザーのパスワード" ←redmineユーザーのパスワードを設定
# Use "utf8" instead of "utfmb4" for MySQL prior to 5.7.7
encoding: utf8mb4
※スペース2個でインデントしないとYAMLの書式に合わずにエラーになるので注意。
Step 4 - Dependencies installation
Redmineに必要なgem(Unicorn含む)をインストールする。
cd /var/lib/redmine
echo 'gem "unicorn"' >> Gemfile.local
gem install bundler
bundle install --without development test
ガントチャートをPNGで出力しようとしたときにエラーが起こってしまうので、ついでにImageMagickもインストールしておく。
yum -y install ImageMagick
Step 5 - Session store secret generation
セッションCookie用のトークンを作成する。
bundle exec rake generate_secret_token
Step 6 - Database schema objects creation
Redmine用のテーブル等を作成する。
RAILS_ENV=production bundle exec rake db:migrate
Step 7 - Database default data set
日本語用の初期データを流し込む。
RAILS_ENV=production REDMINE_LANG=ja bundle exec rake redmine:load_default_data
Step 8 - File system permissions
アップロードファイル用のディレクトリ等のパーミッションを変更する。
mkdir -p tmp tmp/pdf public/plugin_assets
chown -R apache:apache files log tmp public/plugin_assets
chmod -R 755 files log tmp public/plugin_assets
Step 9 - Test the installation
試しにWEBrickを使ってRedmineを起動する。
bundle exec rails server webrick -e production
/var/lib/rbenv/versions/2.7.3/bin/ruby: warning: shebang line ending with \r may cause problems
=> Booting WEBrick
=> Rails 5.2.5 application starting in production on http://0.0.0.0:3000
=> Run `rails server -h` for more startup options
[2021-06-11 03:39:00] INFO WEBrick 1.6.1
[2021-06-11 03:39:00] INFO ruby 2.7.3 (2021-04-05) [x86_64-linux]
[2021-06-11 03:39:00] INFO WEBrick::HTTPServer#start: pid=20457 port=3000
という感じでメッセージが表示されるので、「http://~:3000/」にアクセスしてRedmineのTOPページが見れれば成功。
これでとりあえずRedmineが動く状態になった。
いったんCtrl + cでWEBrickを終了する。
6. RedmineをUnicornで動かせるようにする。
まずはUnicorn用の設定ファイルを作成する。
cd /var/lib/redmine
vi config/unicorn.rb
以下の内容でファイルを作成する。
listen 3000
worker_processes 2
pid "/var/lib/redmine/log/unicorn.pid"
stderr_path "/var/lib/redmine/log/unicorn.log"
stdout_path "/var/lib/redmine/log/unicorn.log"
次にRedmineの設定ファイルを編集し、サブディレクトリで動かせるようにする。
vi config.ru
# This file is used by Rack-based servers to start the application.
# require ::File.expand_path('../config/environment', __FILE__) ←コメントアウト
# run Rails.application ←コメントアウト
require ::File.expand_path('../config/environment', __FILE__) ←追記
map ENV['RAILS_RELATIVE_URL_ROOT'] || '/' do ←追記
run RedmineApp::Application ←追記
end ←追記
以下のコマンドでUnicornを使い、かつredmineディレクトリで動かす。
bundle exec unicorn_rails -c config/unicorn.rb -E production --path=/redmine
「http://~:3000/redmine/」にアクセスしてRedmineのTOPページが見れれば成功。
Ctrl + cで終了する。
7. Redmineをサービス化する。
ここまでの工程でRedmineをサブディレクトリで動かすことができたが、このままだとサーバーを再起動したときなどに手動でRedmineを起動する必要がある。
めんどうなのでサービス化して自動で起動するようにしておく。
vi /etc/systemd/system/redmine.service
以下の内容でファイルを作成する。
[Unit]
Description=Redmine
After=mysqld.service
[Service]
WorkingDirectory=/var/lib/redmine
Environment=RAILS_ENV=production
SyslogIdentifier=redmine
PIDFile=/var/lib/redmine/tmp/pids/unicorn.pid
ExecStart=/var/lib/rbenv/shims/bundle exec "unicorn_rails -c config/unicorn.rb -E production --path=/redmine"
ExecStop=/usr/bin/kill -QUIT $MAINPID
ExecReload=/bin/kill -USR2 $MAINPID
[Install]
WantedBy=multi-user.target
作成できたら以下のコマンドで起動できるか試す。
systemctl start redmine
「http://~:3000/redmine/」にアクセスしてRedmineのTOPページが見れれば成功。
後は以下のコマンドで自動起動を有効にすれば勝手に立ち上がってくるようになる。
systemctl enable redmine
Redmineを再起動したいときは
systemctl restart redmine
と打てばOK。
8. Apache経由でRedmineに接続できるようにする。
このままだと3000番ポートに繋がないとRedmineが見れないので、Apache経由で見れるようにする。
vi /etc/httpd/conf.d/redmine.conf
以下の内容でファイルを作成する。
<VirtualHost *:80>
ProxyPass /redmine http://localhost:3000/redmine
ProxyPassReverse /redmine http://localhost:3000/redmine
</VirtualHost>
作成できたら
systemctl restart httpd
でApacheを再起動し、
「http://~/redmine/」にアクセスしてRedmineのTOPページが見れれば成功。
おまけ. メールを送信できるようにする。
これでRedmineを動かすという目的が達成できたが、メール絡みの設定をしていないためチケットの作成通知等が飛んでこない状態になっている。
メールを飛ばしたいこともあるのでメールの設定を行う。
DB接続用の設定ファイルと同じようにRedmineのインストールディレクトリ配下のconfigディレクトリに「configuration.yml.example」というサンプルファイルが居るので、これをコピーして編集する。
cd /var/lib/redmine/config
cp configuration.yml.example configuration.yml
vi configuration.yml
# = Redmine configuration file
#
# Each environment has its own configuration options. If you are only
# running in production, only the production block needs to be configured.
# Environment specific configuration options override the default ones.
#
# Note that this file needs to be a valid YAML file.
# DO NOT USE TABS! Use 2 spaces instead of tabs for indentation.
# default configuration options for all environments
default:
# Outgoing emails configuration
# See the examples below and the Rails guide for more configuration options:
# http://guides.rubyonrails.org/action_mailer_basics.html#action-mailer-configuration
# email_delivery: ←コメントアウト
# ==== Simple SMTP server at localhost
#
email_delivery: ←コメント解除
delivery_method: :smtp ←コメント解除
smtp_settings: ←コメント解除
address: "localhost" ←コメント解除
port: 25 ←コメント解除
#
# ==== SMTP server at example.com using LOGIN authentication and checking HELO for foo.com
※スペース2個でインデントしないとYAMLの書式に合わずにエラーになるので注意。
ファイルを編集できたら
systemctl restart redmine
でRedmineを再起動する。
これでメールが飛ぶようになる。
外部のSMTPサーバーを使う場合は↑で編集した箇所のすぐ下にサンプルが書かれているので、それを参考に設定すれば何とかなる。