Redmineを4.2から6.0にバージョンアップした記録【Amazon Linux 2】
月日が経つのは早いもんで以前の記事でRedmine 4.2の環境を作ったのが4年前で、
今現在はRedmine 6.0がリリースされちゃってますね!
5.xはサーバーを引っ越すときにでもバージョンアップすれば良いかなぁと思いつつ、
Amazon Linux 2のサポート期間が延びちゃったりしてタイミングを逃していたんですよね。
あんまりメジャーバージョンが離れすぎると後々辛くなるかなぁと思ったので、
夏休みの期間中にバージョンアップしてみることにしました!
OSはAmazon Linux 2のままで、関連ソフトと共にRedmineを4.2から6.0にバージョンアップする感じです。
ただ、今回の作業は以前の記事で作ったプラグイン開発用のプレーンな環境ではなく、
実際にタスク管理に使っている環境なので若干構成が違ってます。
MySQLが8.0ではなく5.7だったり、Redmine3.2から4.2にバージョンアップした環境です。
3.2から4.2の時も結構苦労した覚えがありますが、今回もなかなか手ごわくて2日ほどかかっちゃいましたね…。
アップデート作業をする前にEC2インスタンスのスナップショットを取っておくとうまく行かなかったときに戻せて良いですね。
1. rootに成りあがる。
sudoが面倒なのでrootで作業しちゃいます。
$ sudo su -2. Redmineを停止する。
# systemctl stop redmine3. MySQLを5.7から8.0にバージョンアップする。
# mysql --version
mysql Ver 14.14 Distrib 5.7.44, for Linux (x86_64) using EditLine wrapper
今回アップデートした環境だと
rpm -ivh https://dev.mysql.com/get/mysql80-community-release-el7-3.noarch.rpm
yum-config-manager --disable mysql80-community
yum-config-manager --enable mysql57-community
という感じで8.0を無効化したうえで5.7をインストールしていたので、8.0を有効化してアップデートしていきます。
# yum-config-manager --enable mysql80-community
# rpm --import https://repo.mysql.com/RPM-GPG-KEY-mysql-2023
# yum -y update mysql*

# mysql --version
mysql Ver 8.0.43 for Linux on x86_64 (MySQL Community Server - GPL)
4. Rubyを2.6から3.3にバージョンアップする。
Redmine公式のインストールガイドを見るとRedmine 6.0はRuby 3.1~3.3が対象なようなので3.3に上げていきます。
■Redmine公式のインストールガイド
https://www.redmine.org/projects/redmine/wiki/RedmineInstall#Ruby-interpreter-and-supported-databases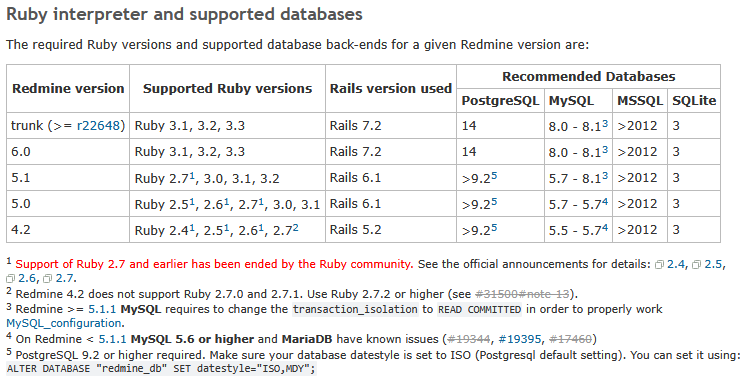
Rubyはrbenvとruby-buildでインストールしていたので、まずはこれらをアップデートしていきます。
# cd /var/lib/rbenv
# git pull
remote: Enumerating objects: 596, done.
remote: Counting objects: 100% (309/309), done.
remote: Compressing objects: 100% (124/124), done.
remote: Total 596 (delta 251), reused 185 (delta 185), pack-reused 287 (from 5)
Receiving objects: 100% (596/596), 203.85 KiB | 22.65 MiB/s, done.
Resolving deltas: 100% (324/324), completed with 15 local objects.
From https://github.com/rbenv/rbenv
 0843745..d1a19a3 master -> origin/master
 * [new branch] fallback-to-path -> origin/fallback-to-path
 * [new tag] v1.2.0 -> v1.2.0
 * [new tag] v1.3.0 -> v1.3.0
 * [new tag] v1.3.1 -> v1.3.1
 * [new tag] v1.3.2 -> v1.3.2
Updating 0843745..d1a19a3
error: Your local changes to the following files would be overwritten by merge:
 .github/workflows/ci.yml
 .github/workflows/release.yml
 README.md
 completions/rbenv.zsh
 rbenv.d/exec/gem-rehash/rubygems_plugin.rb
 src/Makefile.in
 src/bash.h
 src/realpath.c
 test/exec.bats
 test/help.bats
 test/hooks.bats
 test/rbenv.bats
 test/shell.bats
 test/test_helper.bash
 test/version.bats
 test/versions.bats
 test/which.bats
Please commit your changes or stash them before you merge.
Aborting
ローカルの編集分があるから最新のソース取ってこれないよってエラーが出ちゃいましたね。
とりあえず今回は面倒なのでrbenvフォルダを別名で取っておいて、改めてrbenvをインストールしちゃいます。
# cd /var/lib/
# mv rbenv rbenv_old
# git clone https://github.com/rbenv/rbenv.git /var/lib/rbenv
# /var/lib/rbenv/bin/rbenv init
# git clone https://github.com/rbenv/ruby-build.git "$(rbenv root)"/plugins/ruby-build
いったんログインし直します。
# exit
$ sudo su -
インストール可能なバージョンを調べてみます。
# rbenv install --list-all | grep ^3.3.
3.3.0-preview1
3.3.0-preview2
3.3.0-preview3
3.3.0-rc1
3.3.0
3.3-dev
3.3.1
3.3.2
3.3.3
3.3.4
3.3.5
3.3.6
3.3.7
3.3.8
3.3.9
「3.3.9」が一番新しいのでこれを入れて行きます。
# rbenv install 3.3.9
/var/lib/rbenv/plugins/ruby-build/bin/ruby-build: line 1155: 2k: value too great for base (error token is "2k")
==> Downloading openssl-3.0.17.tar.gz...
-> curl -q -fL -o openssl-3.0.17.tar.gz https://github.com/openssl/openssl/releases/download/openssl-3.0.17/openssl-3.0.17.tar.gz
 % Total % Received % Xferd Average Speed Time Time Time Current
 Dload Upload Total Spent Left Speed
 0 0 0 0 0 0 0 0 --:--:-- --:--:-- --:--:-- 0
100 14.6M 100 14.6M 0 0 38.5M 0 --:--:-- --:--:-- --:--:-- 38.5M
==> Installing openssl-3.0.17...
/var/lib/rbenv/plugins/ruby-build/bin/ruby-build: line 725: [: : integer expression expected
-> ./config --prefix=/var/lib/rbenv/versions/3.3.9/openssl --openssldir=/var/lib/rbenv/versions/3.3.9/openssl/ssl --libdir=lib zlib-dynamic no-ssl3 shared -Wl,-rpath,/var/lib/rbenv/versions/3.3.9/openssl/lib

BUILD FAILED (Amazon Linux 2 on x86_64 using ruby-build 20250811-3-gfd0460e8)

You can inspect the build directory at /tmp/ruby-build.20250813152601.19551.FPjhky
See the full build log at /tmp/ruby-build.20250813152601.19551.log
エラーりました。
「/tmp/ruby-build.20250813152601.19551.log」のログを見てみると
cd /tmp/ruby-build.20250813152601.19551.FPjhky
==> Downloading openssl-3.0.17.tar.gz...
-> curl -q -fL -o openssl-3.0.17.tar.gz https://github.com/openssl/openssl/releases/download/openssl-3.0.17/openssl-3.0.17.tar.gz
-> tar xzf openssl-3.0.17.tar.gz
cd /tmp/ruby-build.20250813152601.19551.FPjhky/openssl-3.0.17
==> Installing openssl-3.0.17...
-> ./config --prefix=/var/lib/rbenv/versions/3.3.9/openssl --openssldir=/var/lib/rbenv/versions/3.3.9/openssl/ssl --libdir=lib zlib-dynamic no-ssl3 shared -Wl,-rpath,/var/lib/rbenv/versions/3.3.9/openssl/lib
Can't locate IPC/Cmd.pm in @INC (@INC contains: /tmp/ruby-build.20250813152601.19551.FPjhky/openssl-3.0.17/util/perl /usr/local/lib64/perl5 /usr/local/share/perl5 /usr/lib64/perl5/vendor_perl /usr/share/perl5/vendor_perl /usr/lib64/perl5 /usr/share/perl5 . /tmp/ruby-build.20250813152601.19551.FPjhky/openssl-3.0.17/external/perl/Text-Template-1.56/lib) at /tmp/ruby-build.20250813152601.19551.FPjhky/openssl-3.0.17/util/perl/OpenSSL/config.pm line 19.
BEGIN failed--compilation aborted at /tmp/ruby-build.20250813152601.19551.FPjhky/openssl-3.0.17/util/perl/OpenSSL/config.pm line 19.
Compilation failed in require at /tmp/ruby-build.20250813152601.19551.FPjhky/openssl-3.0.17/Configure line 23.
BEGIN failed--compilation aborted at /tmp/ruby-build.20250813152601.19551.FPjhky/openssl-3.0.17/Configure line 23.
external command failed with status 2
という感じでopenssl絡みでエラーってる様子ですね。
「Can't locate IPC/Cmd.pm in @INC」と言われているので、IPC::Cmdをインストールしてもう一度やります。
# yum -y install perl-IPC-Cmd
# rbenv install 3.3.9 ←しばらく待ちます。
# rbenv global 3.3.9
# ruby -v
ruby 3.3.9 (2025-07-24 revision f5c772fc7c) [x86_64-linux]
5. Redmineを4.2から6.0にアップデートする。
Redmineの公式サイトを見て最新版のURLを調べておきます。
■Redmine公式サイト
https://www.redmine.org/projects/redmine/wiki/Download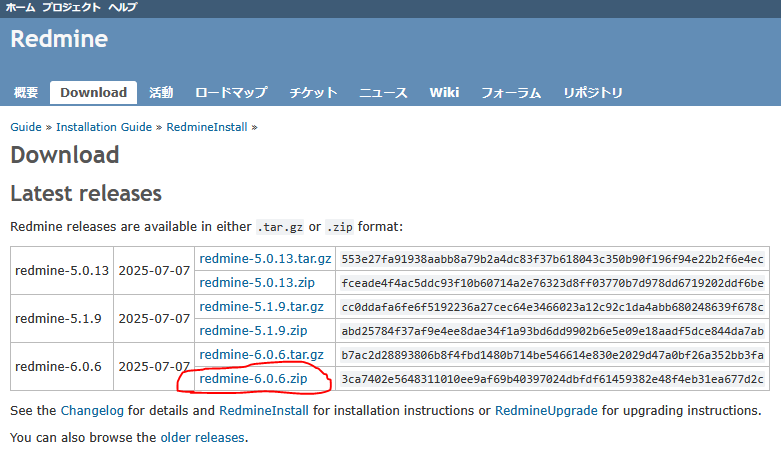
今回は「6.0.6」でした。
流れとしては元のredmineフォルダをredmine_oldにリネームして、
改めてredmineフォルダを作成し、
後で必要なファイルをredmine_oldフォルダからredmineフォルダにコピーする・・・という感じです。
公式の手順( https://www.redmine.org/projects/redmine/wiki/RedmineUpgrade#Option-2-Upgrading-from-a-SVN-checkout )だと
redmineフォルダに最新ソースを適用してやっちゃう方法も書いてあったりしますが、
実際にはプラグインやテーマの移行もしないといけないので、なかなか1発じゃ移行できないんですよね。
1個ずつ移行して確認していかないといけないので、いったん別フォルダに退避して作業していきます。
# cd /var/lib
# mv redmine redmine_old
#
# wget https://www.redmine.org/releases/redmine-6.0.6.zip
# unzip redmine-6.0.6.zip
# mv redmine-6.0.6 redmine
# cd redmine
# mkdir -p tmp tmp/pdf public/assets
# chmod -R 755 files log tmp public/assets
旧ディレクトリから設定ファイルをコピーします。
最低限メールの設定が書いてある「configuration.yml」とDBの接続情報が書いてある「database.yml」を移行すればOKですね。
他の設定ファイルも弄ってる場合は必要に応じて移行していきましょう。
# cp /var/lib/redmine_old/config/configuration.yml /var/lib/redmine/config/configuration.yml
# cp /var/lib/redmine_old/config/database.yml /var/lib/redmine/config/database.yml
次はアップロードされたファイル類を新ディレクトリへ移動させます。
# mv -f /var/lib/redmine_old/files/* /var/lib/redmine/files/後はバンドルインストール…と行きたいところですが、OSが古い関係でうまく行きません!
# bundle config set --local without 'development test'
# bundle install
# bundle exec rake generate_secret_token
と打っていくと
ERROR: It looks like you're trying to use Nokogiri as a precompiled native gem on a system
 with an unsupported version of glibc.

 /lib64/libc.so.6: version `GLIBC_2.28' not found (required by /var/lib/rbenv/versions/3.3.9/lib/ruby/gems/3.3.0/gems/nokogiri-1.18.9-x86_64-linux-gnu/lib/nokogiri/3.3/nokogiri.so) - /var/lib/rbenv/versions/3.3.9/lib/ruby/gems/3.3.0/gems/nokogiri-1.18.9-x86_64-linux-gnu/lib/nokogiri/3.3/nokogiri.so

 If that's the case, then please install Nokogiri via the `ruby` platform gem:
 gem install nokogiri --platform=ruby
 or:
 bundle config set force_ruby_platform true

 Please visit https://nokogiri.org/tutorials/installing_nokogiri.html for more help.

rake aborted!
という感じで「version `GLIBC_2.28' not found」とエラーが出て進めなくなります。
選択肢としては
・GLIBCを2.28にアップデートする。
・古いバージョンのGLIBCでも動くようにNokogiriのバージョンを下げる。
の2択ですね。
GLIBCを2.28にアップデートする場合は
https://miyagadget.page/blog/2025/02/16/glibc2-2x_not_found/
で紹介されてる手順を踏むといけるようです。
ただ、今回は同じサーバーに同居してる他のソフト類への影響が怖かったので、
Nokogiriのバージョンを下げることにしました。
Redmineのリリースノートを見ると、
https://redmine.jp/redmine_today/2025/03/redmine-6_0_4-released/
> Update Nokogiri to 1.18.3 to address CVE-2025-24928 and CVE-2024-56171
というように6.0.4にて脆弱性対応のためにバージョンを上げてるみたいなので、これの1個前の6.0.3で使われてるバージョンに戻していきます。
バージョンを戻しちゃって大丈夫なのかというと、これは各々の判断で行くっきゃないですね。
CVE-2025-24928、CVE-2024-56171はLibxml2の脆弱性で、
https://alas.aws.amazon.com/AL2/ALAS2-2025-2794.html
を見ると「libxml2-2.9.1-6.amzn2.5.16.x86_64」のバージョンで修正されてるみたいです。
サーバーにインストールされてるバージョンを見てみると
# yum list installed libxml2
Installed Packages
libxml2.x86_64       2.9.1-6.amzn2.5.19       @amzn2-core
という感じで上記よりも新しいので、Nokogiriがlibxml2を動的に参照する形であれば古いバージョンに戻してもうまく対策できてたりする…かもしれません。
今回動かしているRedmineは限られたメンバーで使ってるものなのと、
権原ガチガチで運用してるって訳でもないので、ひとまず動けば良いだろうという判断で行きました。
ちなみにNokogiriを使ってるのはwikiのフォーマット処理部分っぽいんですが、
どの部分で使われてるのかまでは特定できませんでした。
wikiページの表示時かHTMLとかPDFへの変換時で使ってそうな雰囲気なんですがイマイチ追い切れず…。
という事でNokogiriのバージョンを下げていきます。
# vi Gemfile
    ~~~略~~~
    12: # gem 'nokogiri', '~> 1.18.3' ←コメントアウト
    13: gem 'nokogiri', '~> 1.16.0' ←追記
戻せたらインストール用のコマンドを打っていきます。
# bundle config set --local without 'development test'
# bundle install
# bundle exec rake generate_secret_token
# bundle exec rake db:migrate RAILS_ENV=production
これでDBのマイグレーションまでできました。
後はUnicornをインストールしてRedmineを動かして…と行きたいところですが、
Unicornで動かすとログイン画面で「ログインを維持」にチェックを入れてログインするとエラーが出てログインできません!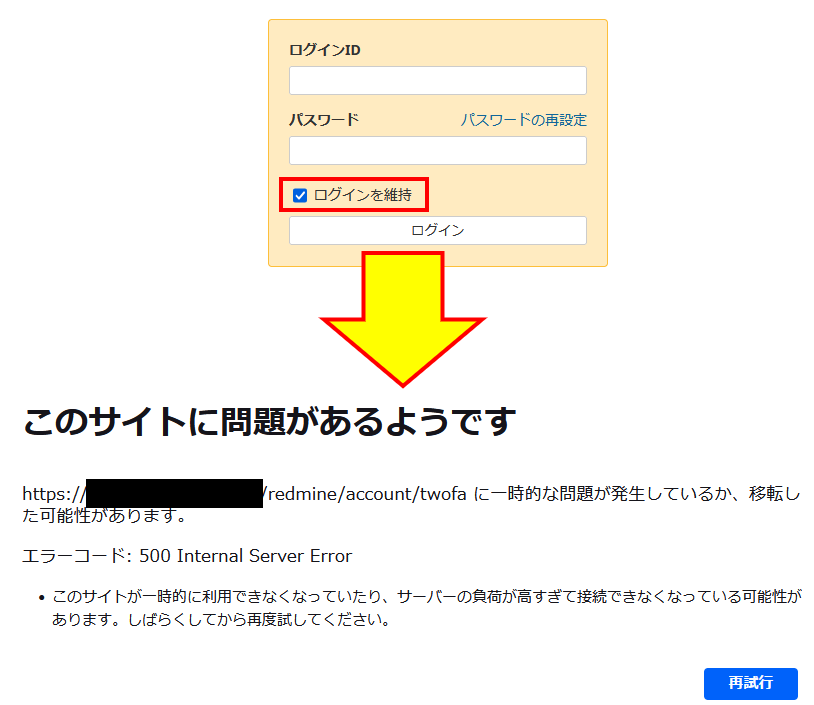
他にもこの現象に遭遇している人が居るみたいでした。
https://www.redmine.org/issues/41823
https://github.com/sameersbn/docker-redmine/issues/569
どうもUnicornのリリースが数年止まってるみたいで、その絡みでうまく動かない様子ですね。
その内復活するかもしれませんが、とりあえず現状はうまく動かないので「Puma」というAPサーバーを使っていきます。
# echo 'gem "puma"' >> Gemfile.local
# bundle install
これでPumaが入ったので、後はUnicornで動かしていたのをPumaで動かすように設定を変えていきます。
# vi config.ru
    01: # This file is used by Rack-based servers to start the application.
    02:
    03: # require_relative 'config/environment' ←コメントアウト
    04: # run Rails.application ←コメントアウト
    05: require_relative 'config/environment' ←以下の行追記
    06: Redmine::Utils::relative_url_root = "/redmine"
    07:
    08: map ENV['RAILS_RELATIVE_URL_ROOT'] || '/' do
    09:   run RedmineApp::Application
    10: end

# vi config/puma.rb
    以下の内容を追記(新規ファイルです。)
    01: ENV['RAILS_RELATIVE_URL_ROOT'] = "/redmine"
    02: application_path = '/var/lib/redmine'
    03: directory application_path
    04: environment = :production
    05: pidfile "#{application_path}/tmp/pids/puma.pid"
    06: bind 'tcp://0.0.0.0:3000'

# vi /etc/systemd/system/redmine.service
    01: [Unit]
    02: # Description=Redmine Unicorn Server ←コメントアウト
    03: Description=Redmine Puma Server ←追記
    04: After=mysqld.service
    05:
    06: [Service]
    07: Type=simple
    08: User=root
    09: WorkingDirectory=/var/lib/redmine/
    10: Environment=RAILS_ENV=production
    11: Environment=RAILS_RELATIVE_URL_ROOT=/redmine
    12: # SyslogIdentifier=redmine-unicorn ←コメントアウト
    13: SyslogIdentifier=redmine-puma ←追記
    14: # PIDFile=/var/lib/redmine/tmp/pids/unicorn.pid ←コメントアウト
    15: PIDFile=/var/lib/redmine/tmp/pids/puma.pid ←追記
    16:
    17: # ExecStart=/var/lib/rbenv/shims/bundle exec "unicorn_rails -c config/unicorn.rb -E production --path /redmine" ←コメントアウト
    18: ExecStart=/var/lib/rbenv/shims/bundle exec "puma -e production" ←追記
    19: ExecStop=/usr/bin/kill -QUIT $MAINPID
    20: ExecReload=/bin/kill -USR2 $MAINPID
    21:
    22: [Install]
    23: WantedBy=multi-user.target

# systemctl daemon-reload
さぁこれで起動する準備が整いました!
早速サービスを起動して…とやりたいところなんですが、なぜか最初にサービスとして起動するとうまく行かないので、
いったん以下のコマンドで起動させます。
# bundle exec rails server -e production
/var/lib/rbenv/versions/3.3.9/bin/ruby: warning: shebang line ending with \r may cause problems
=> Booting Puma
=> Rails 7.2.2.1 application starting in production
=> Run `bin/rails server --help` for more startup options
Puma starting in single mode...
* Puma version: 6.6.1 ("Return to Forever")
* Ruby version: ruby 3.3.9 (2025-07-24 revision f5c772fc7c) [x86_64-linux]
* Min threads: 0
* Max threads: 5
* Environment: production
* PID: 5071
* Listening on http://0.0.0.0:3000
Use Ctrl-C to stop
特にエラーが出なければ「Ctrl + C」で終了させます。
そしてお待ちかねの起動です!
# systemctl start redmine「http://~/redmine/」にアクセスして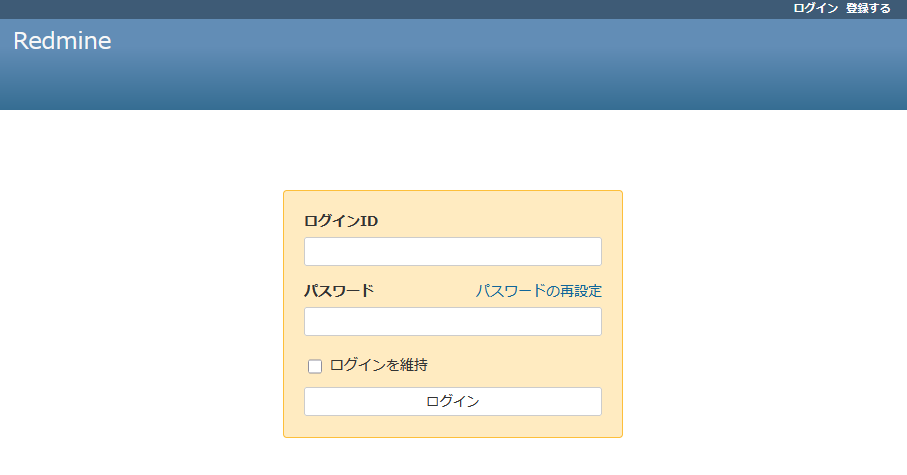
という感じでログイン画面が無事に表示されれば成功です!
これで動くようにはなったんですが、このままだとWYSIWYGエディタのボタンアイコンが表示されなかったりします。
なので以下のコマンドでassetsファイルを作り直します。
# cd /var/lib/redmine/public
# rm -rf assets
# bundle exec rake assets:precompile RAILS_ENV="production" RAILS_RELATIVE_URL_ROOT=/redmine
# systemctl restart redmine
チケットの作成画面に行ってちゃんとアイコンが表示されてればOKです!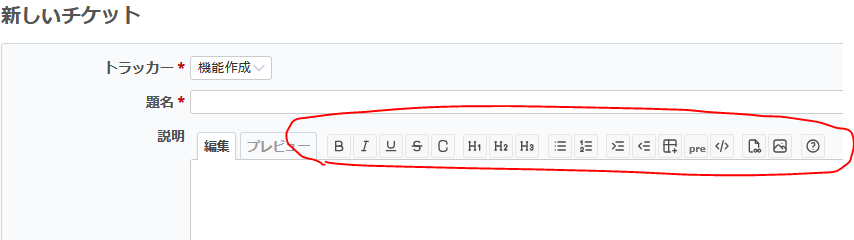
6. テーマ、プラグインを移行する。
これは1個ずつ頑張ってやってくしかないですね。
テーマは「/var/lib/redmine_old/public/themes」 → 「/var/lib/redmine/themes」、
プラグインは「/var/lib/redmine_old/plugins」 → 「/var/lib/redmine/plugins」
に1個ずつコピーしていってRedmineを再起動して試していく感じですね。
テーマはHTMLの構造が変わってる関係でアップデート必須ですね。
プラグインもRedmine 5からzeitwerkという仕組みに変わったみたいなので割とアップデートが必要そうですね。
「view_customize」というプラグインの場合は
# cd /var/lib/redmine/plugins/
# git clone https://github.com/onozaty/redmine-view-customize.git view_customize
# cd ../
# bundle install --without development test
# bundle exec rake redmine:plugins:migrate RAILS_ENV=production
# systemctl restart redmine
という感じで最新版を落としてきて移行できました。
使っているプラグインが対応していることを祈るのみですね…!